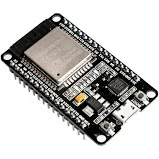
1. Devices
- ESP32
- Air quality sensor
- some jumper wires or four pins cable
2. Create the Arduino IDE Project
there are two ways for you to create your project file, directly use the library file or DIY. So I give some details about these ways.
- Install the library for our sensors
The so-called library is actually a project which has been created by other people. it may include some outside h.files and cpp.files or just a .ino file that can be directly used. How to manage the outside library?
Firstly, download the library (take air quality sensor library as an example) from the link: https://github.com/Seeed-Studio/Grove_Air_quality_Sensor. Secondly, move this library into your Arduino IDE libraries. Thirdly, select sketch->includeLibrary->add a zip. library->choose the downloaded library.
Firstly, download the library (take air quality sensor library as an example) from the link: https://github.com/Seeed-Studio/Grove_Air_quality_Sensor. Secondly, move this library into your Arduino IDE libraries. Thirdly, select sketch->includeLibrary->add a zip. library->choose the downloaded library.
- DIY
In most cases, the outside library is not compatible to our project. So we need to DIY. But how to DIY?
Firstly, we need to know that most of the air quality sensors output analog signals. The caption of these pins on sensors are GND, VCC, NC and SIG. GND connects 0 volt. VCC connects power, 3V3 or 5V. NC means not connection. SIG means the signal.
Secondly, set a pin on ESP32 board as the INPUT mode to let it receives outside signal.
Thirdly, connecting these pins. VCC-->3V3; GND-->GND; SIG-->pin number (you've chosen and set its mode)
3. Source code (disconnect the sensor during uploading codes)
- Obtain the standard value: get the mean of multi reads
#include"Arduino.h"
float standard=0;
float temper;
int j=0;
int _pin=2; //D2
void setup()
{
Serial.begin(115200);
pinMode(_pin,INPUT);
Serial.println("sys_starting...");
delay(20000);//200000
init_value=analogRead(_pin);
Serial.println("The init voltage is ...");
Serial.println(init_value);
while(init_value)
{
if(init_value<798 && init_value>10)// the init voltage is ok--you can adjust the threshold
{
Serial.println("Sensor ready.");
break;
}
else if(init_value>798||init_value<=10)
{
Serial.println("waitting sensor init..");
delay(60000);//60000
init_value=analogRead(_pin);
}
else{
break;
}
}
}
void loop()
{
if(j==150)//sum 5 minutes
{
standard=temper/150;
temper=0;
Serial.print("Vol_standard in 5 minutes:");
Serial.println(standard);
j=0;
delay(3000);
}
else
{
temper+=analogRead(_pin);
j++;
Serial.print("current number is: ");
Serial.println(j);
delay(10);
}
}
here is screenshot of initiation, it seems we have to wait for a while to complete initiation. After initiation, we will get standard
- Test the air quality
#include"Arduino.h"
float init_value=0;
float first_value=0;
float standard_value=2885; //from experience
float last_value=0;
int _pin=2; //pin
void setup()
{
Serial.begin(115200);
pinMode(_pin,INPUT);
Serial.println("sys_starting...");
delay(20000);//200000
init_value=analogRead(_pin);
Serial.println("The init voltage is ...");
Serial.println(init_value);
while(init_value)
{
if(init_value<798 && init_value>10)// the init voltage is ok
//if(init_value<2890 && init_value>10)// you can adjust the threshould
{
first_value=analogRead(_pin);//initialize first value
last_value=first_value;
Serial.println("Sensor ready.");
break;
}
else if(init_value>798||init_value<=10)
{
Serial.println("waitting sensor init..");
delay(6000);//60000
init_value=analogRead(_pin);
Serial.println(init_value);
}
else{
break;
}
}
}
void loop()
{
first_value=analogRead(_pin);
if(first_value-last_value>400||first_value>700)
{
Serial.println("High pollution! Force signal active.");
// return 0;
}
else if((first_value-last_value>400&&first_value<700)||first_value-standard_value>150)
{
Serial.print("sensor_value:");
Serial.print(first_value);
Serial.println("\t High pollution!");
// return 1;
}
else if((first_value-last_value>200&&first_value<700)||first_value-standard_value>50)
{
//Serial.println(first_vol-last_vol);
Serial.print("sensor_value:");
Serial.print(first_value);
Serial.println("\t Low pollution!");
// return 2;
}
else
{
Serial.print("sensor_value:");
Serial.print(first_value);
Serial.println("\t Air fresh");
// return 3;
}
}


No comments:
Post a Comment